Wishlist page – Kozen –
Unleash the power of wishlist in Kozen theme to increase sales and conversion. Allow customers start saving their favorite products to wishlist for later viewing.
Intuitive, full-featured wishlist module that doesn’t require your users to log in to save favorites and is optimized for mobile users.
Where can the users view their wishlist products ?
Whether a user is logged in or not, a user can view its products added to wishlist either by clicking the heart icon on the header

Or if the user is logged in, he can access the wishlist page from his account page

How to enable the Wishlist feature ?
1 Add a wishlist page
The wishlist page is where your customer can view their favorites products added via the wishlist button/icon
- From your Shopify dashboard, click Online store > Pages
- Click Add page
- Give a title to your wishlist page and optionally a description
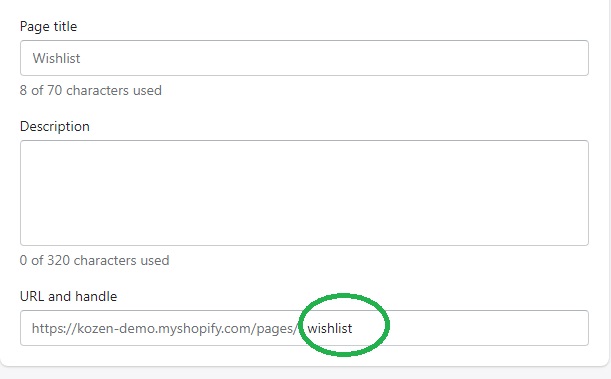
- Click Edit Website SEO, then under URL and handle name the page exactly wishlist
Important : The wishlist page is connected to the customer account under the URL ../pages/wishlist. In order to make it functional, please give the page the exact handle name as shown in the image below.

2 Assign the Wishlist template
One you have created the Wishlist page, you need to assign the Wishlist template to it.
- Under Template suffix, chose page.wishlist and click Save
- Note : The theme must be published in order to see and apply the wishlist template

3 Enable the Wishlist feature from the theme editor
Header icon :
- Theme editor, click Header> Enable Wishlist
Product page :
- Theme editor, click the top dropdown menu and select Products> Default product > Add block > Wishlist
Product card icon :
- Theme editor, click Theme settings > General> under collection page, click Enable Wishlist
Wishlist in action
[yasr_visitor_votes]
